Pie crust recipe and tutorial
Pie crust is so incredibly easy to make that I'm not sure how it got its reputation for being difficult. So, instead of just giving you my basic pie crust recipe, I thought I'd take a few pictures as well to show you exactly how easy it is.
First, here's the basic recipe, this will make a two crust, 9-inch pie:
2 1/2 C. flour
1/2 tsp salt
3/4 C. shortening
6-7 TBSP cold water
That's it, just four ingredients.
First, mix the flour and salt into a bowl. I'm using whole wheat pastry flour here, but you can can use white. Then add your shortening. For shortening you can use vegetable shortening, butter, or lard. I'm using lard for this pie crust.

Really, you can buy it in the store. (Or, if you've bought a side of pork, you can render your own.) Lard gets a bad rap. (Check out this article, if you're interested in reading more.) I buy it in boxes like this:

But back to the pie crust. Once you've added your shortening, use your pastry blender to mix it in. You want the fat completely mixed in with the flour. Sometimes the pastry blender will get clogged up and you'll need to scrape it off with a knife and keep going.

Eventually it will all get worked in and look like this. Often this will be described as the mixture forming pea-sized bits.

Now you need to add the water. The water needs to be really cold to keep the fat from softening. (You want it to wait to do this until after it's in the oven.) Go ahead and put an ice cube in your glass of water and keep it in the refrigerator until you need it. Measure in the water. I always measure in the smallest amount first and see if that will do it. You want to add the least amount of water possible. Once you can form it into two balls, you're set.

At this point, you could wrap up the dough and freeze it for later if you want. Just thaw the dough thoroughly before you continue.
Now it's time to roll out the dough. This can be a frustrating step. The dough is sticky, but you don't want to add too much flour or your crust will be tough. I solve the problem by using waxed paper. It's not the most frugal method, but I'm not making pie crust everyday and it saves my sanity. Tear off four sheets of waxed paper; two for each crust. On one sheet of paper, place one of the balls and press slightly to form a disk.

Cover with the other sheet of waxed paper and roll out using your rolling pin. The dough will roll easily, not stick to your rolling pin or work surface and it's easy to do more than one crust as a time. I roll all the crusts I'm making out in a row and then stack them up so they're ready to use.

Here's my helper, L.

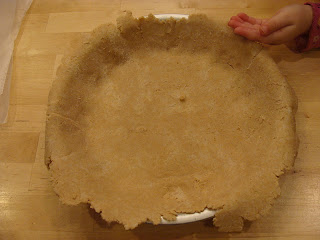
When you're ready to make the pie, place one pie crust in the pan.
Fill with your choice of filling... we made apple pie last night.

Drape the second crust over the filling.

Using a sharp knife, cut off the excess crust from around the pie pan.

Crimp the crust using your fingers.

You need to cut vents in the top crust to let out the steam. Sometimes I write words.

And it's ready to bake. When I have extra crust, I sometimes make pie crust cookies with them. Roll out the extra dough between some wax paper. (I reused some from the crusts.) Sprinkle with cinnamon sugar. You could add some dots of butter as well.

Roll up into a long tube.

Cut into slices and put in a baking dish or a baking pan or even a piece of foil. Bake with your pie for about 25 minutes.

When I'm baking pie, I always put either a piece of foil or a baking pan under the pie because the fruit has a tendency to bubble out. The finished product:

Now you try!
First, here's the basic recipe, this will make a two crust, 9-inch pie:
2 1/2 C. flour
1/2 tsp salt
3/4 C. shortening
6-7 TBSP cold water
That's it, just four ingredients.
First, mix the flour and salt into a bowl. I'm using whole wheat pastry flour here, but you can can use white. Then add your shortening. For shortening you can use vegetable shortening, butter, or lard. I'm using lard for this pie crust.

Really, you can buy it in the store. (Or, if you've bought a side of pork, you can render your own.) Lard gets a bad rap. (Check out this article, if you're interested in reading more.) I buy it in boxes like this:

But back to the pie crust. Once you've added your shortening, use your pastry blender to mix it in. You want the fat completely mixed in with the flour. Sometimes the pastry blender will get clogged up and you'll need to scrape it off with a knife and keep going.

Eventually it will all get worked in and look like this. Often this will be described as the mixture forming pea-sized bits.

Now you need to add the water. The water needs to be really cold to keep the fat from softening. (You want it to wait to do this until after it's in the oven.) Go ahead and put an ice cube in your glass of water and keep it in the refrigerator until you need it. Measure in the water. I always measure in the smallest amount first and see if that will do it. You want to add the least amount of water possible. Once you can form it into two balls, you're set.

At this point, you could wrap up the dough and freeze it for later if you want. Just thaw the dough thoroughly before you continue.
Now it's time to roll out the dough. This can be a frustrating step. The dough is sticky, but you don't want to add too much flour or your crust will be tough. I solve the problem by using waxed paper. It's not the most frugal method, but I'm not making pie crust everyday and it saves my sanity. Tear off four sheets of waxed paper; two for each crust. On one sheet of paper, place one of the balls and press slightly to form a disk.

Cover with the other sheet of waxed paper and roll out using your rolling pin. The dough will roll easily, not stick to your rolling pin or work surface and it's easy to do more than one crust as a time. I roll all the crusts I'm making out in a row and then stack them up so they're ready to use.

Here's my helper, L.

When you're ready to make the pie, place one pie crust in the pan.

Fill with your choice of filling... we made apple pie last night.

Drape the second crust over the filling.

Using a sharp knife, cut off the excess crust from around the pie pan.

Crimp the crust using your fingers.

You need to cut vents in the top crust to let out the steam. Sometimes I write words.

And it's ready to bake. When I have extra crust, I sometimes make pie crust cookies with them. Roll out the extra dough between some wax paper. (I reused some from the crusts.) Sprinkle with cinnamon sugar. You could add some dots of butter as well.

Roll up into a long tube.

Cut into slices and put in a baking dish or a baking pan or even a piece of foil. Bake with your pie for about 25 minutes.

When I'm baking pie, I always put either a piece of foil or a baking pan under the pie because the fruit has a tendency to bubble out. The finished product:

Now you try!


Comments